Table of Contents

Introduction
In today’s day and age, “data” is like liquid gold. The advancements made while leveraging this data have particularly helped the Fintech industry mint millions in the recent past. The Financial Technology industry or Fintech as we call it, in the last 5 years has grown into multiple verticals and many new giants have been inducted into this shiny new world.
Now when we focus on the fintech side of things, the transactional data that we get every day needs a good user interface (UI) to make sense of it. A good User Interface or (UI) helps any tool that we build around it in capturing all the data sets in a meaningful way. Loads of numbers with no insights, does no one any good. Hence, the need for a good UI.
The expectations from the tool range from, let’s say pagination (breaking tabular data into pages for better consumption), to filtering personalization, API integration, search, and much more.
Sounds like a job cut out for Superman right?
Do we even have a tool in the market that can do all of this right out of the box?
Yes, we do! And it’s called the Data-tables.
“The Data-tables“, is a plugin built using jQuery, and can be used to build tables that can consume larger datasets. It also has inbuilt functionalities like search, sorting, filtering, API calls, dynamic rendering, and many more making it a one-stop shop for all your data needs.

Design (The Superman Outfit)
With superhuman-like abilities, the design, or as we like to call it, the superman outfit, needs to be flexible, clean, and easy to integrate with different frameworks.
The most reliable framework in the market right now is React JS. The dream scenario would be we could make Data-tables work with react. So let’s see how that pans out.

Step 1:

npm install datatables.net    # Core library
npm install datatables.net-dt
Step 2:

after the above, make sure to install jQuery
Step 3:

add this to your code initialising the jQuery first
const $ = require("jquery");
$.DataTable = require("datatables.net");
$(document).ready( function () {
    $('#table_id').DataTable();
} );
If you visit the official website of the data-tables plugin https://www.datatables.net/ you would be able to see the bare-bone structure of the data-tables. It’s a straightforward yet clean structure, and the documentation is extensive, detailed, and sturdy, making it the ideal choice for our design.
Now jumping onto the outfit.
The data tables have predefined CSS classes which can be modified to our own needs and design requirements.
So what started like this

was made into something like this here at Decentro.
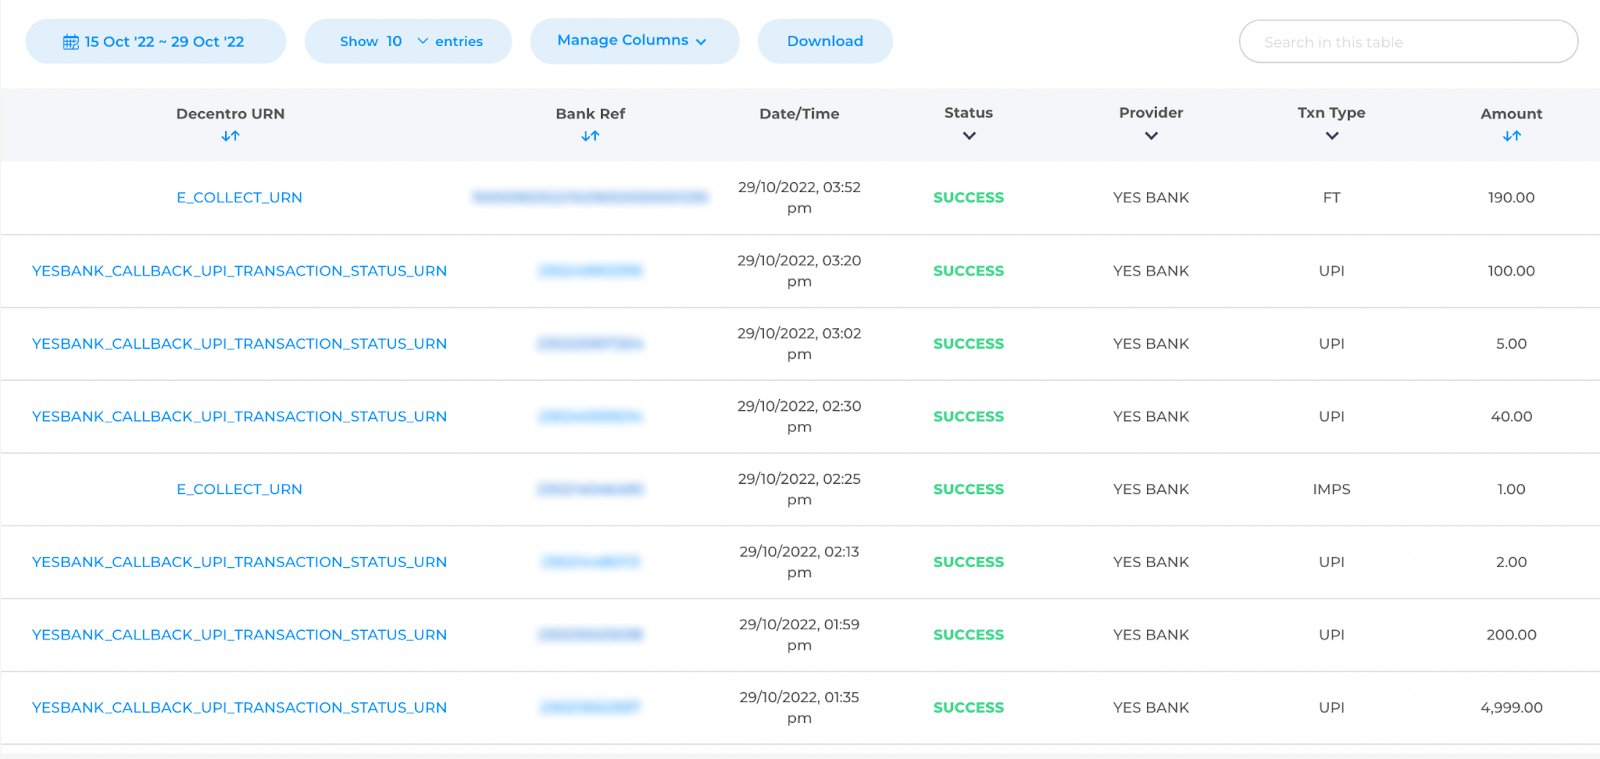
Simple, clean yet effective.
A seamless transformation of Clark Kent to Superman. Fascinating, isn’t it?
Data-tables Functionalities (Superpowers)
What’s a superhero without its superpowers? So, let’s talk about the functionalities i.e. Superpowers of Data Tables.

The data-tables already have inbuilt functionalities like search, filtering, and sorting. However, the differentiator in the case of data-tables is the ability of the user to add their custom data on top of the core ones. It’s a custom bonanza.
So, in the React way of building the table, you have to make a functional component that returns a table with the table id and the reference of the table is held in a variable: table_id
function Table (){
return (
<table
          id="table_id"
          className="display"
          width="100%"
          ref={(el) => (table_id = el)}
        ></table>
)
}
Now you render the table once you have the data fetched from the API call. Simple, yet effective.
ReactDOM.render(
            <Table />,
            document.getElementById("main_container")
          );
Now one can talk about the capabilities that the data tables hold, right from setting them up and then ultimately adding them to the table component built previously.
Settings / Options
So if you read through the document Options, you will find that the data tables have a lot of inbuilt settings that can be controlled, and adjusted during the initialization of the table. This is the start of your table component.
$(table_id).DataTable({
            data: dataSet,
            destroy: "true",
            searching: "true",
            retrieve: "true",
            paging: "true",
            bSort: true,
            responsive: true,
            order: [],
            lengthChange: "true",
            dom:
              "<'topwrapper'>" +
              "<'tran-wrapper'f<'tran-date'><'show_entries'><'#colvis'><'#download'><'#loading1'>>" + //should add a back button to call method to destroy the table
              "<'row scrollme'<'col-sm-12'tr>>" +
              "<'row'<'col-sm-4'i><'col-sm-4 text-center'><'col-sm-4'p>>",
            language: {

              search: ",
            },
            buttons: [
              { extend: "copy", className: "copy-button" },
              { extend: "pdf", className: "pdf-button" },
            ],
This table component can be controlled via the table setting using the following options:
Data: array of objects – This is the data that you provide to the table and the one that you wish to be displayed.
Destroy: boolean – When set to true, your table can be destroyed using the destroy() api which will remove the table from the dom tree.
Searching: boolean – When set to true, will allow search functionality to work.
Paging: boolean – When set to true, pagination will be added.
bSort – boolean – When set to true, the sorting option will be enabled.
Responsive – boolean – When set to true, you can use bootstrap CSS to control the responsiveness of the table.
Dom: This is an important option where you can control how the table elements are rendered when the table is initialized and built for the first time. Additionally, you can add your dom elements using class names and tags
- < and > – div element
- <“class” and > – div with a class
- <“#id” and > – div with an ID
- <“#id.class” and > – div with an ID and a class
and several strings can be used to render some of the in-built elements of the table
- l – length changing input control
- f – filtering input
- t – The table!
- i – Table information summary
- p – pagination control
- r – processing display element
The following extensions can be initialized through the dom option:
- B – Buttons
- R – ColReorder
- S – Scroller
- P – SearchPanes
- Q – SearchBuilder
For any further information, you always refer to the following page, dom .
Callback methods:
Initcomplete:
initComplete: function () {
//your code here
}
This is the initial call-back method that is triggered once the initialization of the table is complete so if we want to perform any actions we do it. Right from rendering different components or making an API call or un-mounting a component, to adding custom events and CSS can also be carried out.
InfoCallback:
infoCallback: function (settings, total, pre, recordsDisplay, start, end, max,) {
//your code here
}
This callback method is triggered once the info block of the table is initialized as it is one of the first components that is rendered. You can control the elements shown in the info box and the pagination side of things.
Columns options:
The columns option in the initialization parameter allows you to define details about the way individual columns behave. You can also refer to the full list. Please see the related parameters below for a full list of column options that can be set list of parameters under the columns option, please refer to the link
Note that if you use columns to define your columns, you must have an entry in the array for every single column that you have in your table (these can be null if you don’t wish to specify any options).
columns: [
              { data: "transaction_id", title: "Decentro URN" },
              {
                data: "reference_number",
                title: "Ref",
              },
              { data: "timestamp", title: "Date/time", type: "date" },]
Here when we receive data from an API call, we can define each column data to be shown in that column and the title and data-type of the column as well. That’s the level of customization, data-tables operate on.
ColumnDefs:
Similar to columns, this parameter allows you to assign specific options to columns in the table. However, in this case, the column options defined can be applied to one or more columns. Additionally, not every column needs to be specified.
This parameter is an array of column definition objects, where the options available exactly match those for columns (see below for a list of options in the related links).
In addition to the column property options, columnDefs requires targets a property to be set in each definition object columnDefs.targets. This target property tells DataTables which column(s) the definition should be applied to. It can be:
- 0 or a positive integer-column index counting from the left
- A negative integer-column index counting from the right
- A string-class name will be matched on the <th> (table header) for the column
- The string _all – all columns (i.e. assign a default)
Additionally, targets can be either a single option from the list above or an array of options (the different types can be mixed in the array if required). For example targets: [ -1, -2 ] would target the last and second last columns in the table.
columnDefs: [
              { targets: [0, 1, 6], orderable: true },
              { targets: [2], orderable: false, width: 100 },
              {
                targets: [3],
                render: function (data) {
                  return data.toUpperCase()
                }
              },]
Search
So the search in the data-table works like a charm. You have the UI search by default which means whatever data is loaded on the UI, you can search through it!
But what if there is a requirement for us to search the database and make an API call? Data-Tables make that possible.
$('input[type="search"]').on("input", function () {
                query = $(this).val();
                var info = $(payment_table_collection).DataTable().page.info(); //ref(tab)
                length = info.recordsDisplay;
                if (length === 0 && query.length > 5) {
                  ApiCallToSearch(query); //call to search in the DB or server
                }
                if (query.length === 0) {
                  ShowTheInitialData(consolidated);
                }
              });
So in the above code, we can see clearly that the input box is taken as a jQuery element and an input event function is added to it so it’s called on every input. The query string will hold the value entered and the length variable will hold the data shown on the page.
So the condition is applied where whenever the data on the page is empty for the given query then make an API call with that query and redraw the table.
And when the user removes the query string shows the initial content that was loaded!
Voila! we have a backend search, as well as a UI search both integrated in a smart way
Pretty cool and simple right? One superpower unlocked!
Filtering
Column filtering is another important functionality required in most tables that can handle huge amounts of data. In our case, let’s say that we have successful transactions for a particular user to be shown, and what we can do is apply the success filter on the status column to display the transactions with status success.
var table = $(your table id ).DataTable();
var api = table.api()
api.columns([3, 4]).every(function () {
create the structure for the filters
var select = $(
        '<div id="selected' +
        column.index() +
        '"><label class="labelforfilter"></label></div>'
      )
var vals = $(":checked", select)
            .map(function (index, element) {
              return $.fn.dataTable.util.escapeRegex($(element).val());
            })
            .toArray()
            .join("|");

          column
            .search(
              vals.length > 0 ? "^(" + vals + ")$" : "",
              true,
              false
            )
            .draw();
        });
column
.data()
.unique()
.sort()
.each(function (d, j) {
var str = d.replace(/\\s/g, "_");
select.append(
'<label id="label' +
j +
'" class="labelforfilter">' +
d +
"<input id=" +
str +
' type="checkbox" value="' +
d +
'"></label>'
);
});The above code will create a box with checkboxes with the labels of the columns mentioned under the API.columns([3,4]) method. Hence, all the column data displayed over these two columns can be added to the filter box, and when the checkbox is clicked, you can toggle the filter on and off.
Data-tables use the search() API to apply the filter and redraw the table every time the user action has initiated the addition of data takes about 600 ms.
Adding more data to the existing table
Let’s say that we have millions of records, and we can’t fetch them in a single API call. What do we do then? We use pagination, and we fetch it when the user needs to see the data or changes various parameters to receive the data.
So is there a way to add more data to the existing table using an API call via data-tables. Again, a yes!
var table = $(table id).DataTable();
        var datatable = $(table_id).dataTable().api();
        datatable.rows.add(dataSet);
        datatable.draw(false);
In the above, the dataSet is the new data that you had received from the API call, and by using these three lines of code, you add all that data to the table and redraw the table with the new data added to the existing one.
The same can be applied to search as well when we get new data set as a result of a search API query, making it a seamless and flexible execution.
Limitations (Kryptonite)
Much like other tools, even data-tables have their own set of drawbacks.

Default sorting:
By default, the data-tables apply a sort, and the problem is if the table has many data-type ranging from date time integers and long usually the order is found to be wrong, adding to manual effort.
Sorting feature:
The sorting feature won’t work on all the datatypes that we receive. Due to this if the sorting option is set to true we might find some differences in the order of the data that was initially received and so the preprocessing of this data cant be predicted at times if the data-tables do not understand the data-type
Column Data-type:
So the column data type can be a string and that can include any type of data but when it comes to date and time the data-table won’t be able to read the UTC string by default. So if you’re showing a timestamp in your table you have to perform manual conversion so that it can show the data in the proper order.
CSS and adding custom components:
As the whole tool or plugin is built using jQuery it does not go well with modern javascript. For example, embedding a react component inside the default jQuery element can become cumbersome. If we want to completely change the CSS of an already present HTML element we won’t be able to override it. Instead, we have to build our own using the API provided by data-tables.
Conclusion
Beyond its drawbacks, data-tables functionalities do make it an effective tool for consuming large datasets in an effective fashion. It is a great tool if you build an application requiring faster development and robust features. This coupled with the tremendous support of the forum that data-tables have, make it one of the best tools to handle data in the front end in this modern age.
A tool that stands tall even with its faults.
A TRUE SUPERMAN.
In case it spikes your interest, our engineering team at Decentro has penned more tech blogs to satisfy the developer within you. Be it our journey with Metabase, why we moved to Kong API Gateway from NGINX, or a pocket guide on API Request Validation.
We’ll see you next time with yet another tech story! And in case you wish to connect with us, feel free to drop us a line at hello@decentro.tech.